This week, I’m deviating from the blog’s usual history-and-folklore content! Instead, let’s talk about four simple pieces of hardware and how they work: a faucet, a rotary vane pump, a pin tumbler lock, and a chain hoist. Each works in a clever fashion, and when enlarged to the size of a room, it has components an enterprising PC could walk around in. Figuring out what these giant machines do and how to operate them from the inside makes neat puzzles. Plus, the faucet, pump, and lock link together to make a cool little dungeon!
This post is brought to you by beloved Patreon backer Justin Moor. Thanks for helping keep the lights on! If you want to help keep this blog going alongside Justin, head over to the Patreon page – and thank you!
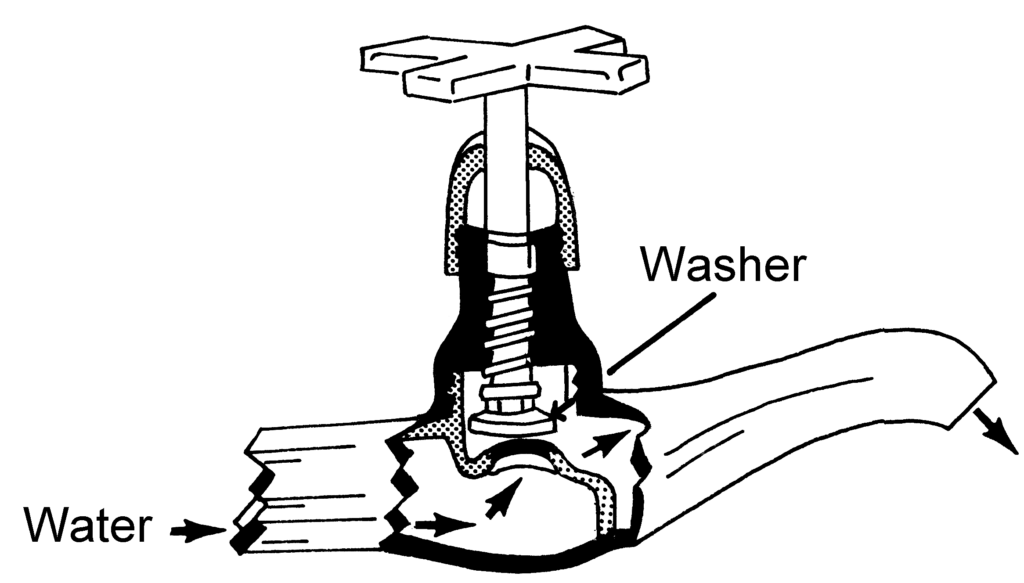
We’ll start with the faucet, specifically one of those old-fashioned screw-top or spigot-style faucets of the type still popular in the UK. As you can see in the diagram above, internally a faucet consists of two chambers joined by a hole. To turn off the faucet, you rotate a screw that lowers a washer into the hole and stops the flow of water between the chambers. Rotate the screw the other way and the stopper lifts out of the hole and the flow of water resumes.
We can imagine a room-sized faucet that’s part of an enormous water line that’s long since dried up or been shut off. Both chambers are dry, and the PCs can walk around in them. If the faucet is shut, PCs in the left chamber can see the stoppered hole in the ceiling but may not be able to do much about it. PCs in the right chamber can see the screw they share the chamber with – and if they grab it and work together to turn it, they can elevate the stopper and pass through to the left chamber.
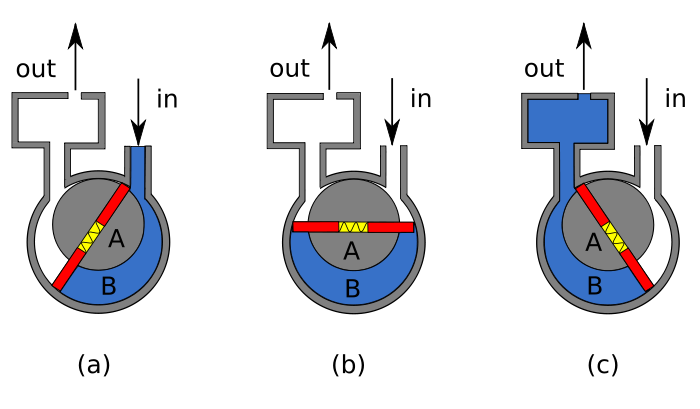
A rotary vane pump forces fluid through it using rotating chambers that change size as they go. You have a rotating shaft (A, above) with movable paddles coming from it. The paddles (in red) are kept flush with the wall of the container they’re in, often with the help of springs (in yellow). But the shaft is off-center; it’s not in the middle of the container. That has some interesting implications for the pressure on the fluid being moved.
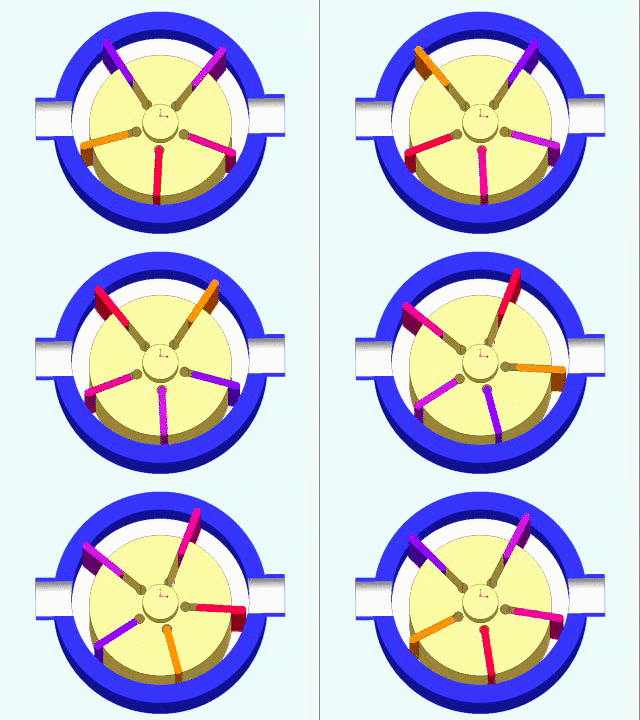
When a paddle first sweeps past the intake, it opens a small space by the intake. As the paddle keeps moving, that space grows larger. That creates a low-pressure zone by the intake, drawing in whatever gas or liquid this pump moves. This is step (a), above. Then the next paddle reaches the intake. That cuts our space off from the outside world, as in step (b). And when our space reaches the output, in step (c), the space starts to shrink. That forces the fluid in it out, through the output. You don’t have to just use two chambers. It works fine if you have lots of chambers, as the gif below demonstrates.
We can imagine a rotary vane pump so large that each chamber is the size of a small room. The power to it is dead, so to pass through it, you have to walk into a chamber and push on the wall to rotate the shaft with you inside the pump. What’s great about it is that the GM can conceal cool things in the other chambers of the pump! A four-chamber pump is perfect for this. You can hide something cool in the chamber opposite the one the PCs use and put clues in the two chambers between the PCs’ chamber and the one with the hidden secret.
As the PCs push to move their chamber, they first cut themselves off from the intake. Eventually, they see a sliver of the output in the outer wall of the container. As they push on their wall (the paddle), the sliver expands to reveal part of the mouth of a tunnel. It’s not the whole mouth – much of the mouth is still obscured – but it’s plenty wide enough to pass through. Ask the players if they would like to leave the chamber now, or push until the whole tunnel is revealed. They’ll probably leave now because it’s easier. When they leave and look behind them, they see a wall down the middle of the tunnel mouth, with their former chamber on one side and a whole other chamber on the other side!
Whatever you’re hiding in the opposite chamber, put something that hints at it in the newly-revealed chamber. Is it a terrible monster? Put some gnawed bones in there. Wealth? A gold coin jammed in where the opposite wall meets the side of the pump, caught in the machinery. A fugitive? A smear of feces left behind when you knocked over her chamber pot rotating the pump.
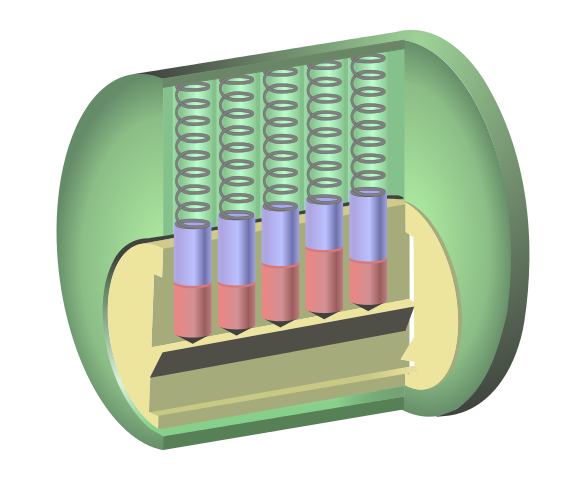
A pin tumbler lock is the normal sort of lock you probably have on your front door. The mechanism is based on a series of pins. Each pin is two cylinders stacked on top of each other. Each cylinder is a slightly different height. Springs above the cylinders keep them pressed down along the top of the keyhole.

When you insert your key, it pushes up on the pins. Because the key has the right shape, it pushes each pin up just the right amount, so the break between the two cylinders that make each pin falls along the break between the rotating cylinder that contains the keyhole (yellow) and the unmoving outer cylinder fixed in the door (green).
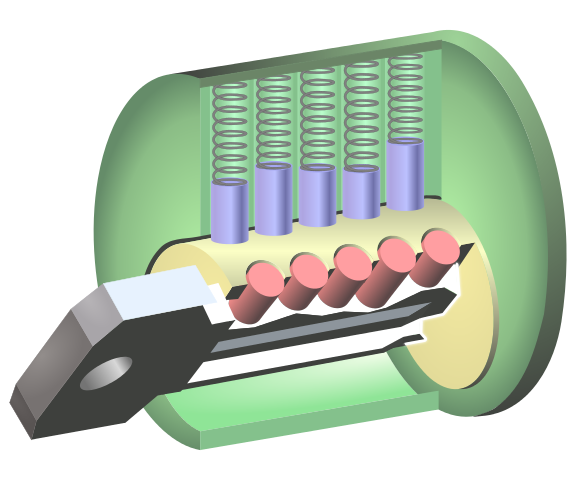
Since the pins are no longer preventing the inner cylinder from rotating, you can now turn the key!
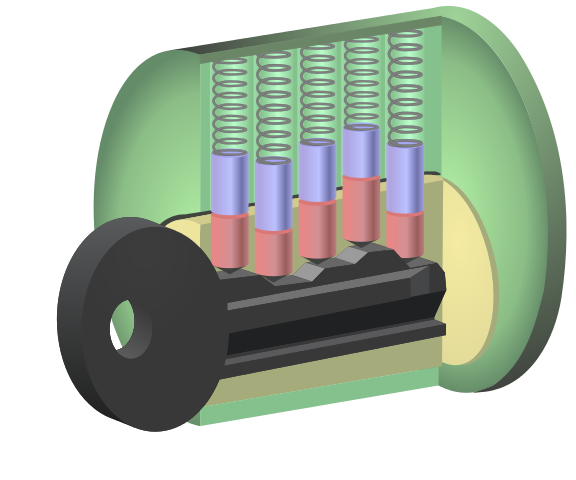
If you insert the wrong key, the breaks between the two cylinders do not line up along the edge of the rotating cylinder, and the cylinder remains stuck in place.
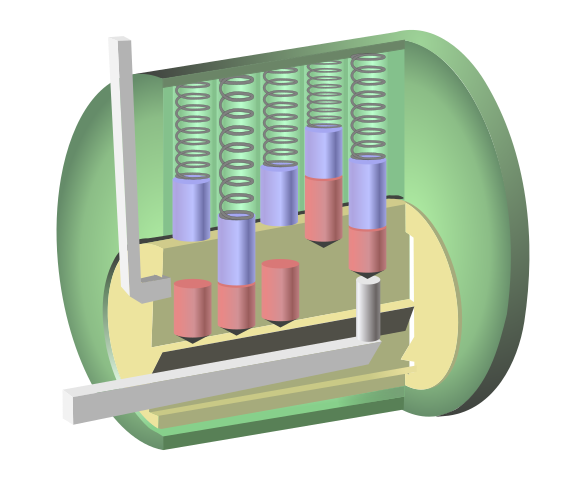
Let’s imagine a lock so big our PCs can walk inside the keyhole. Let’s also assume it’s a modern-style keyhole that doesn’t go all the way through the door. They want to actuate the lock so they can get past a giant door. Can they pick the lock from the inside?
The first step of lockpicking is rotating the inner cylinder as far as you can (usually not very far). This puts sideways pressure on the pins. You need that because otherwise, if you lift a pin to the right height, it’ll fall back down as soon as you move on to the next pin. The sideways pressure means that when you get a pin to the right height, the inner cylinder will rotate just a little bit, and the top half of the pin will be stuck in the outer cylinder, obstructed from sliding back into the inner cylinder. The white lever on the left side of the image above is a ‘tensioning bar’ and is used to apply that rotational pressure. Your PCs can get the same effect with a big piece of lumber or somesuch.
Don’t be surprised if your players don’t use a tensioning bar, though! It’s not an intuitive concept. Instead, if there are fewer pins than PCs, they might just have a different PC hold each pin in the right place while another PC rotates the lock from outside with her hands.
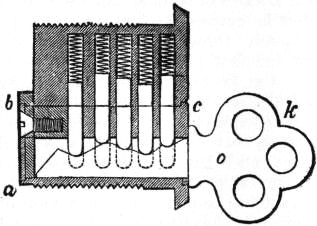
The lock, pump, and faucet can be combined to make a mini-dungeon! The party hears rumors that something they need is hidden inside this weird, colossal device abandoned in the wilderness. The device is a sphere with a faucet protruding from one side, air holes on the other side, and a lock on top. Unlock the lock and the access hatch it’s built into (the size of a garage door) will swing open down into the sphere. That lands you in a room with char on the walls and light slanting in through the air holes – clearly something was burned in here. A tunnel in the wall leads to a rotary vane pump that pumped the smoke produced by the fire out through the faucet. The faucet is currently closed. The pump was powered by a broken motor that’s not accessible from inside or outside the sphere. It’s not clear what the purpose of this machine is (it’s a dumb design for a pipe or an incense burner), but it sure exists – and the thing the party needs is inside the opposite chamber of the rotary vane pump. Plus, since there are two ways into the machine (through the faucet or the lock), you don’t run the risk of stymying the players with a puzzle and watching the whole session grind to a halt. If they get stumped on the faucet, they can try again with the lock, and vice-versa.
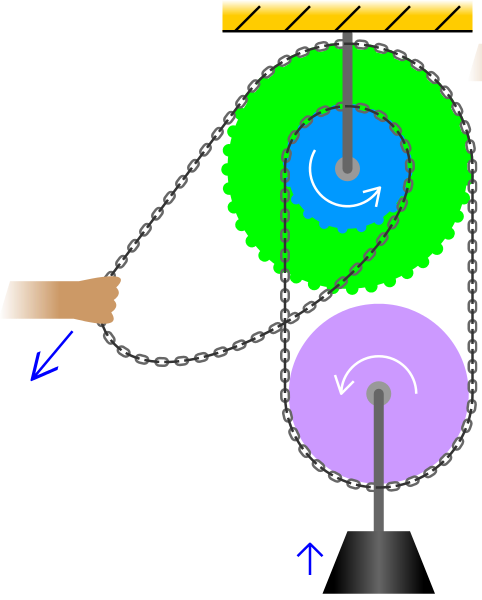
Our final piece of neat equipment is an old-fashioned chain hoist. This is a long loop of chain that passes through three pulleys. The top two pulleys are fixed together: when one rotates once, so does the other. The load hangs from the bottom pulley and does not move unless the chain is moved. The trick to understanding the chain hoist is to notice that you’ve effectively got two loops hanging down from the top two pulleys. One has the load hanging from it. The other is free. Because both loops are formed by the same unbroken piece of chain, if the free loop gets longer, the loaded loop must get shorter.
When the chain is pulled as shown, the big top pulley lets more chain out into the free loop (the one with the hand on it) than the little top pulley takes in. That means the free loop gets longer and the loaded loop gets shorter, bringing the load upwards. Pull on the chain in the opposite direction and the free loop will get shorter while the loaded loop gets longer, lowering the load.
The utility of a chain hoist depends on the size difference between the two upper pulleys. If they’re very different in size, it’s like pedaling a bike in high gear: you don’t have to move the chain very far to move the load, but it takes a lot of work to move that chain. If the two top pulleys are more similar in size, it’s like pedaling a bike in low gear: you have to move a lot of chain to move the load even a short distance, but moving the chain is actually pretty easy. In real life, chain hoists have top pulleys of similar sizes since the whole point is to make it easy to raise and lower heavy loads.
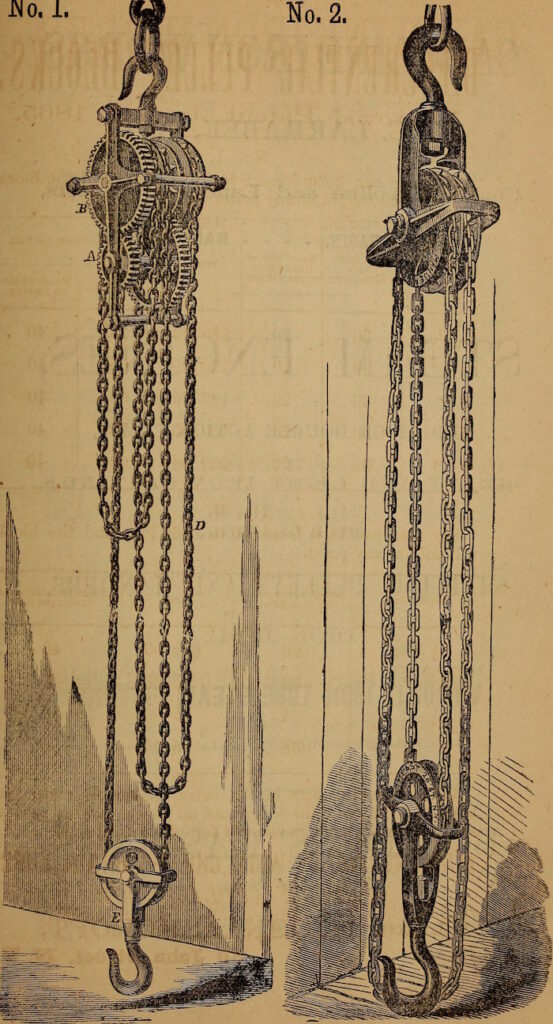
To use a chain hoist as a puzzle, put the PCs inside it. The two top pulleys are a single piece of hollow, transparent material. The PCs enter through the axle. It’s transparent so they can see what they’re doing. The inside of the top two pulleys is built like a hamster wheel. If the PCs walk up the curved inner side of the top pulleys, the device rotates underneath them. If they walk in one direction, it raises the load. If they walk in the other direction, it lowers the load. The PCs are after the load the chain hoist raises and lowers. Put a hatch to the outside so the PCs can crawl onto the chain. Doing so is risky, though, since it unbalances the hoist and will cause it to move on its own. The hoist comes back into balance when the PC is directly above or below the load.
The key to making this an interesting puzzle is to discourage solving it by trial and error. A great way to do that is to start a combat as soon as the PCs enter the chain hoist. Often, it can be frustrating that six seconds of combat can last ten minutes at the table. Here, that’s an advantage. The PCs probably can’t solve the problem through trial and error because you can’t do much in a single combat round in most systems – even less when you’re being attacked! But between their turns, the players will have lots of time to look at the diagrams you helpfully provided and try to figure out how to manipulate the machine they find themselves in.
For the combat, use flying monsters that can bedevil the PCs while they’re climbing the chain or climb inside the top two pulleys to attack them there. Consider setting it up so that falling off the chain while climbing isn’t fatal. The chain hoist might be over water, or falling off the chain might just teleport you back inside the top two pulleys with some fall damage. Players might be tempted just to polish off their enemies and worry about the puzzle later, so a time limit might be helpful too. If you don’t get the Mcguffin from the load within 7 rounds, the bad guys swoop in and steal it or somesuch.
Source:
- As a lifelong Dragonlance fan, I have to cite my debt to Dragons of Autumn Twilight for the chain hoist combat. The book has a chaotic fight (supposedly taken from one of Margaret and Tracy’s D&D games) on a chain elevator a lot like what I describe above, albeit without the chain hoist or puzzle components.
- The gears in the promo image are by @isisfra


